
Tutorial
Tour Your Experiences for the First Time
In this tutorial you’ll tour Nevent’s Experiences section for the first time. By the end you’ll know how to navigate the three areas it’s made up of, read your events’ data in the list, check sales history, and review available add-ons. About 8 minutes.
Before you start
Section titled “Before you start”To follow this tutorial you need access to the Nevent panel with at least one event created. The event doesn’t need to have any tickets sold: navigating and reading the list works the same even if capacity is at zero.
Step 1: Go to the Experiences section
Section titled “Step 1: Go to the Experiences section”In Nevent’s side menu, inside the “Content” block, click Experiences.
The screen that opens is the central list of your events. In the header you’ll see the title “Experiences” with the subtitle “Manage your events and experiences to connect with your audience.” To the right of the title are three actions: the Create button, the Sync button, and an expandable menu with more options (three-dot icon).
This is the screen you start from to manage everything related to your events. Treat it as the usual entry point whenever you want to check the status of your experiences.
Step 2: Filter the list by time period
Section titled “Step 2: Filter the list by time period”Above the table there are two filtering tools.
The first is the view filter, with four options: Current, Past, All, and Waitlists. The default active view is Current, which shows events with a future or ongoing date.
The first three filter by date. The fourth, Waitlists, filters by type: it shows only the experiences where your audience signs up instead of buying a ticket. If you don’t have any yet, the view appears empty.
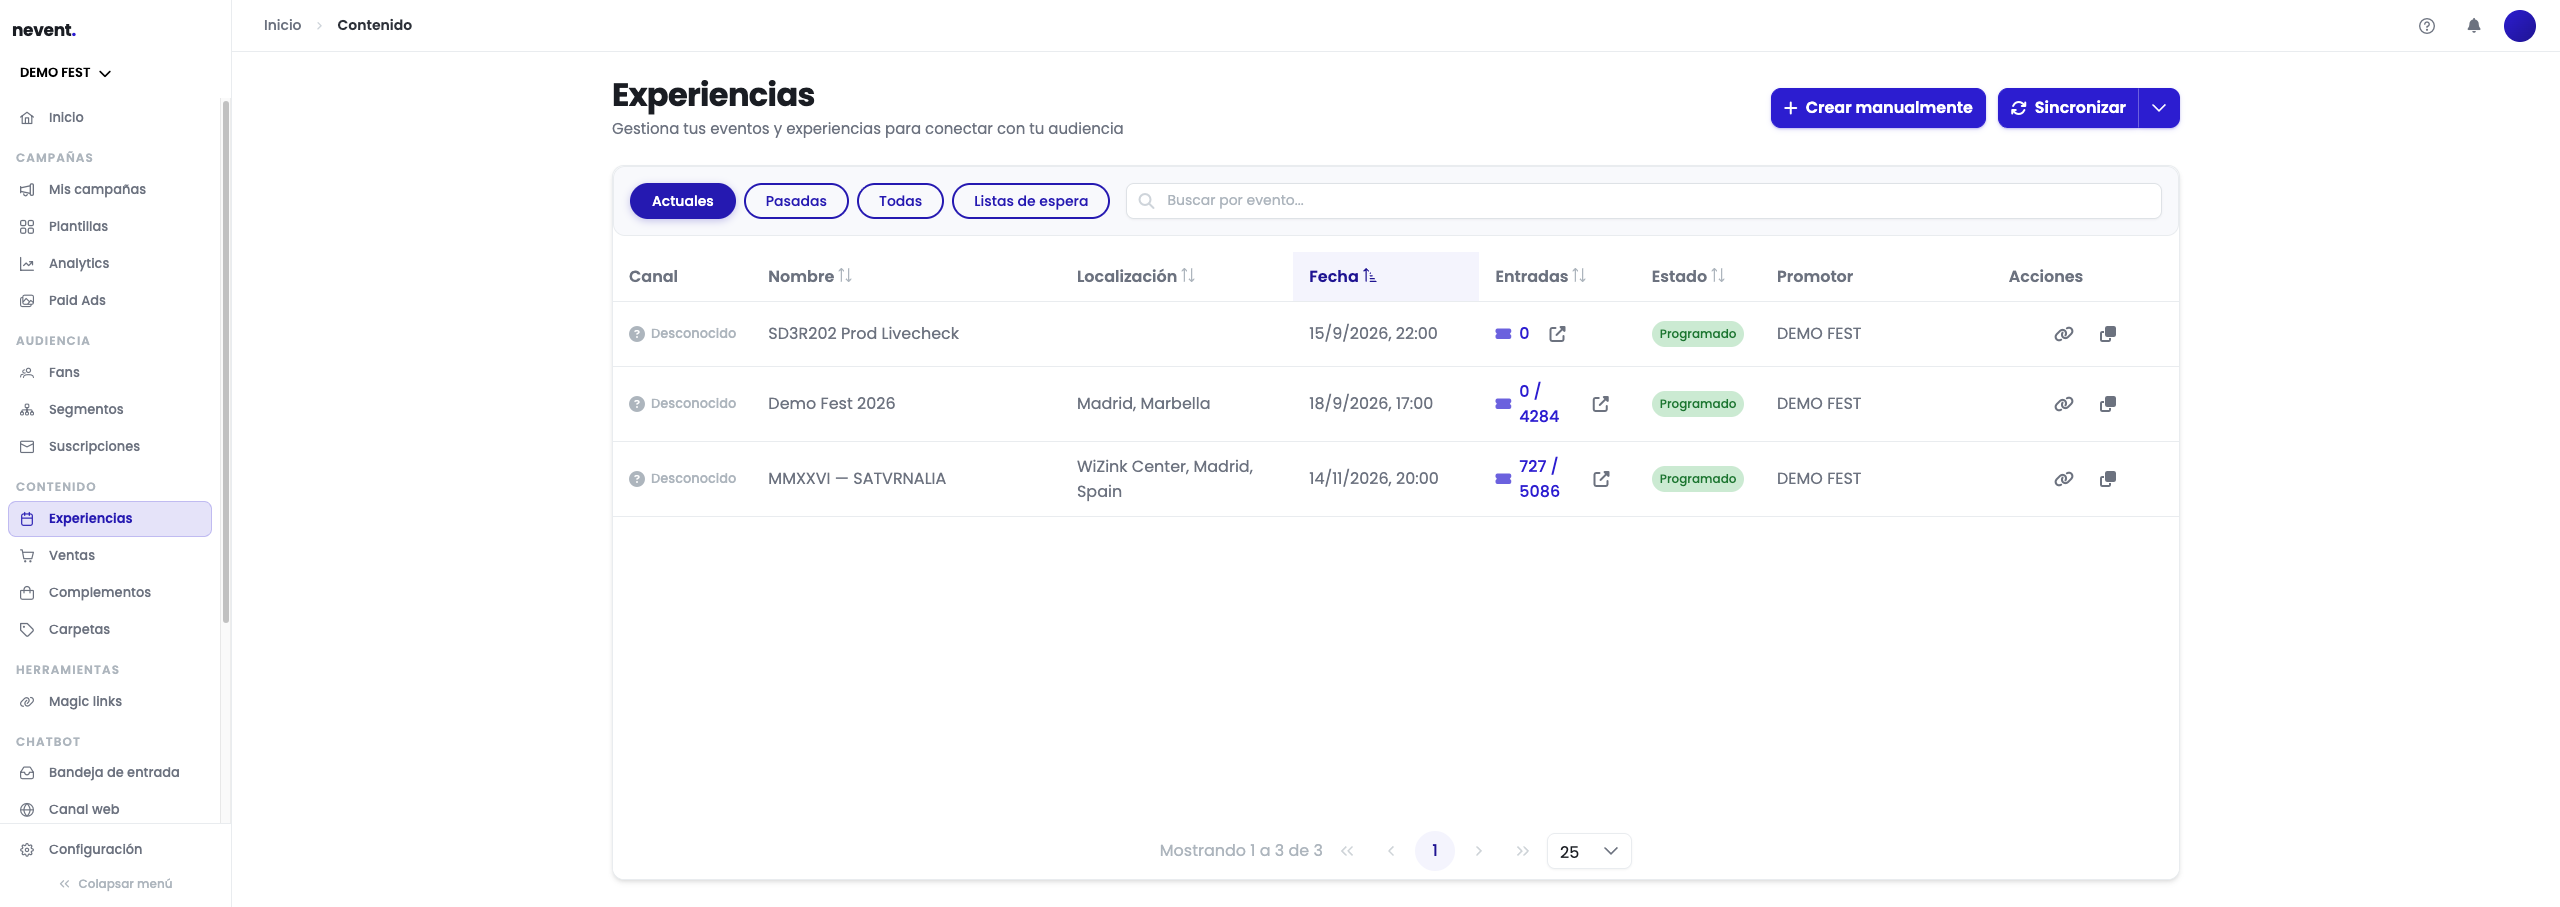
The second tool is the search field “Search by event…”, which filters by event name as you type.
Practice switching views: click Past and watch how the table updates. Go back to Current to continue with the tutorial.
Step 3: Read the table columns
Section titled “Step 3: Read the table columns”Each row in the list corresponds to an event and contains seven columns. Let’s see what each one tells you.
| Column | What it tells you |
|---|---|
| Channel | The channel through which the event is sold, with its name and logo. If Nevent cannot identify it, it shows “Unknown”. |
| Name | The event’s name as it appears on the sales page. |
| Location | The place or city where the event takes place. |
| Date | The event’s start date and time. |
| Tickets | Tickets sold against total capacity (for example, 727 / 5,086). |
| Status | The event’s current status (for example, Scheduled). |
| Promoter | The name of the organization managing the event. |
The Tickets column is the most useful for a quick glance: it tells you immediately how much you’ve sold and how much you have left to sell. If you see “0 / 4,284,” the event exists but no sales have been recorded yet.
When capacity is not set, the cell cannot show a fraction, so it displays only the tickets sold. A bare “0” means the event has no sales yet and its capacity is not configured, not that the figure is missing.
In waitlist experiences, this column counts people signed up rather than sales, and it is labelled accordingly.
In the column on the right, outside the numbered table, there are two actions per row: Copy link and Clone experience. The first gives you the event’s sales URL directly to share it. The second creates a copy of the event with its configuration.
Step 4: Access an event’s detail
Section titled “Step 4: Access an event’s detail”To enter an event’s detail, click the name in any row, or the View attendees button that appears when you hover over the row.
When you enter, the left side menu changes and shows that event’s internal sections. That journey is covered in other guides; in this tutorial we stay in the list view and the other two sections of the area.
Press your browser’s back button or click Experiences in the side menu to return to the event list.
Step 5: Explore the sales history
Section titled “Step 5: Explore the sales history”In the side menu, inside the “Content” block, click Sales.
Here you’ll see the full history of every purchase made on your events. The view is read-only: you can view and filter, but not modify any sale from this screen.
The table has seven columns:
| Column | What it tells you |
|---|---|
| Date | The exact date and time the purchase was made. |
| Channel | The name of the channel through which the sale was made, with its logo when it has one. Direct sales on your own page appear as Nevent. |
| Reference | The transaction’s unique identifier (a character string). |
| Buyer (name) | The full name of the person who bought. |
| Buyer (email) | The buyer’s email address. |
| Amount | That sale’s amount in euros. |
| Status | The transaction’s status (for example, Completed). |
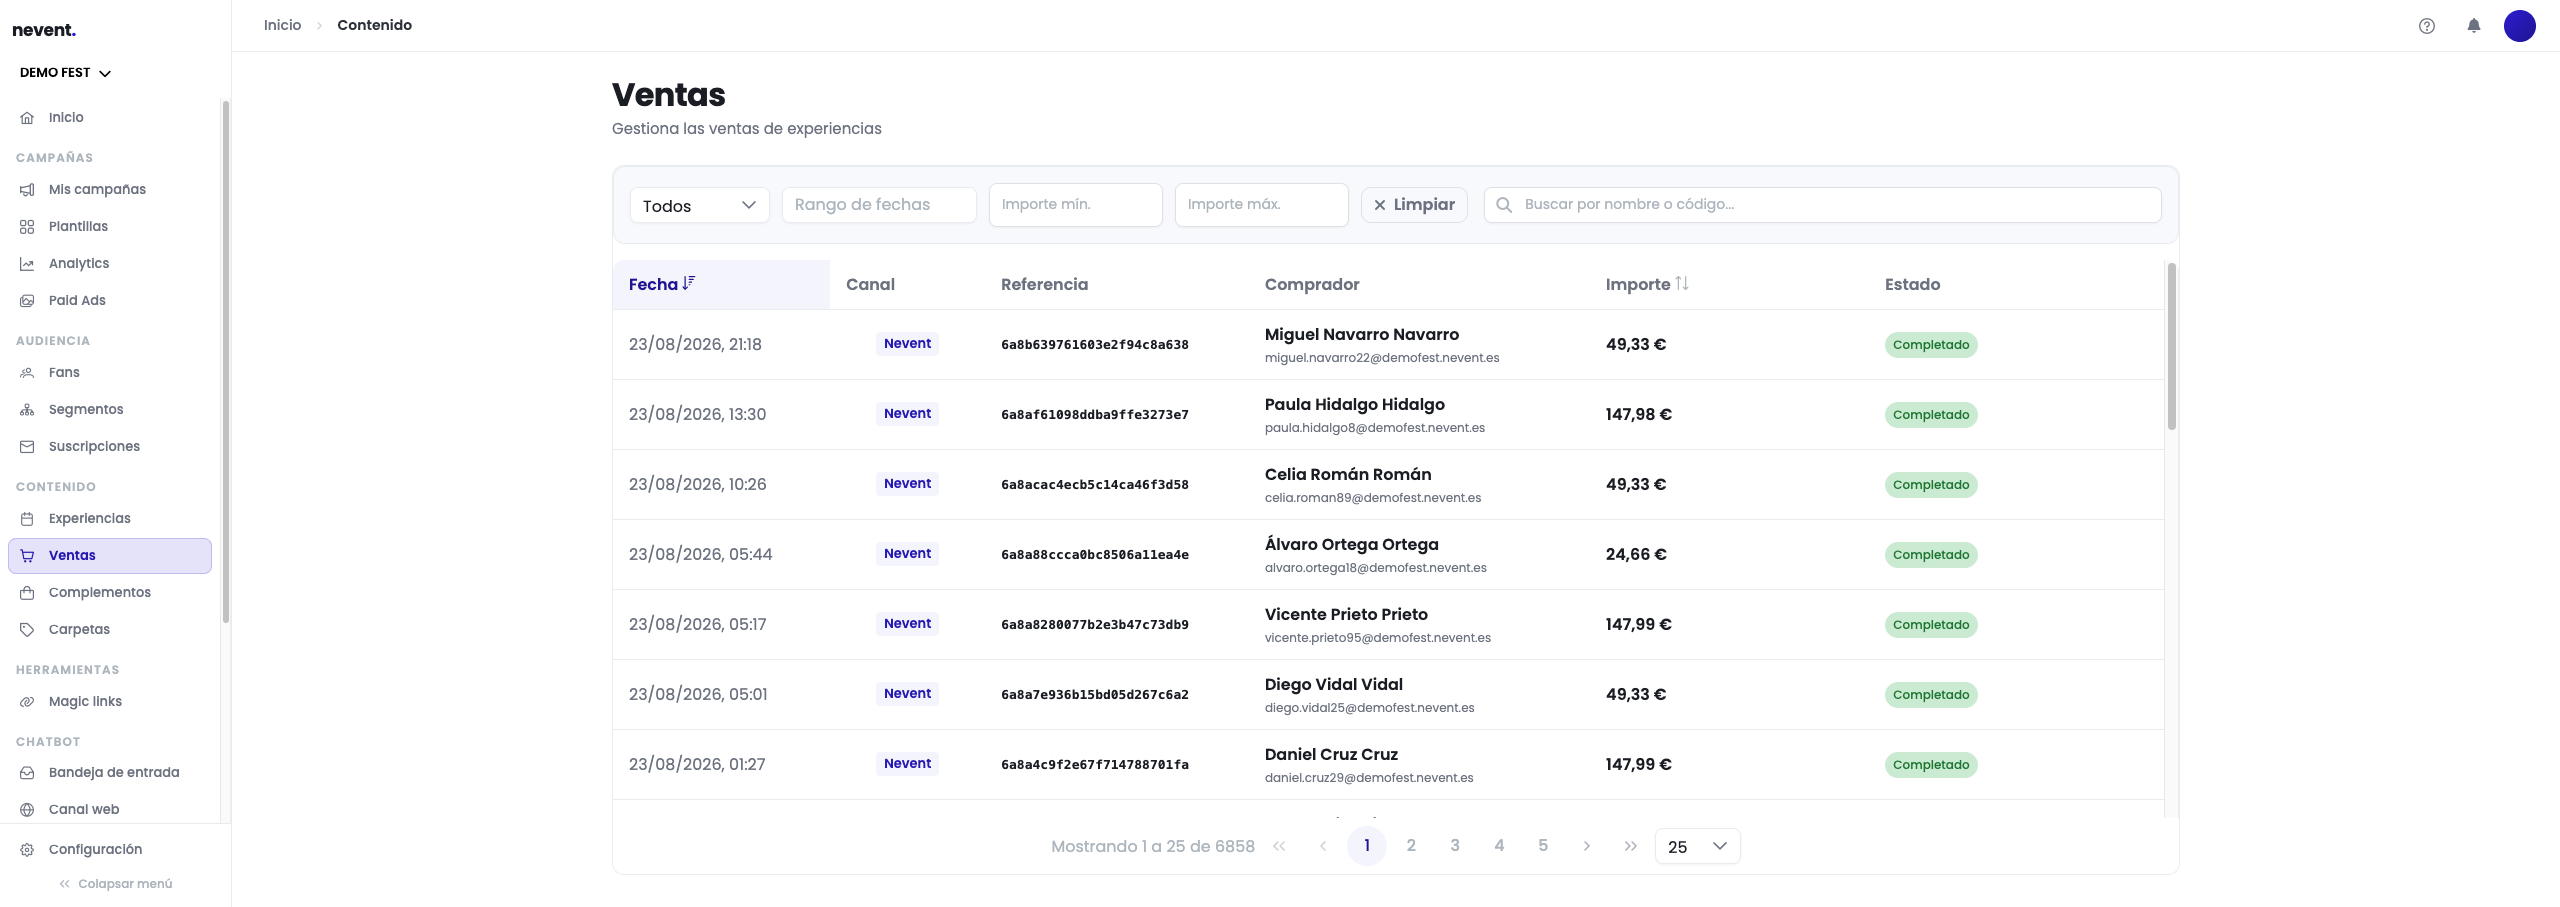
Above the table there’s a set of filters to narrow down results:
- A dropdown to filter by a specific event or view all.
- A date range selector.
- Minimum amount and maximum amount fields.
- A search field by buyer name or reference code.
- The Clear button to reset all filters at once.
The table is paginated and shows 25 records per page. If you have a lot of sales, use the filters to narrow down before paginating.
Step 6: Review the add-ons
Section titled “Step 6: Review the add-ons”In the side menu, inside the “Content” block, click Add-ons.
Add-ons are extra products that can be sold alongside the ticket: merch, accommodation, transport, food, drinks, and activities, among others.
In the header you’ll see the title “Add-ons” with the subtitle “Add-ons list.” The available actions are the same as in Experiences: Create, Sync, and the expandable menu.
Right below the header there’s a row of category tabs that act as a quick filter: All, Merch, Food, Drinks, Transport, Accommodation, and Activities. The tab active by default is All.
The add-ons table has six columns:
| Column | What it tells you |
|---|---|
| Channel | The channel or platform icon. |
| Name | The add-on’s name. |
| Price | The unit price in euros. |
| Sales | The number of units sold. |
| Status | Whether the add-on is available for sale or out of stock. |
| Creation date | The date the add-on was created. |
The two possible statuses you can find in this column are Available (the add-on is active and can be bought) and Out of stock (no units left).
Practice the category filter: click Merch and watch how the table shows only add-ons from that category. Click All to return to the full view.
Result
Section titled “Result”You’ve now toured the three areas that make up Nevent’s Experiences section:
- The event list, with its status, capacity, and quick action columns.
- The sales history, with its date, amount, and search filters.
- The add-ons catalog, with its categories and availability statuses.
From here you can dig deeper into any of the three areas or explore an event’s internal detail.