
Cómo hacer
Import your contacts
In this guide you’ll learn to import a contact list into Nevent: from where to find the import button to how to review the result before confirming. About 5 minutes.
Before you start
Section titled “Before you start”You need a file with your contacts’ data. Nevent accepts two formats:
- CSV (.csv): a text file where each row is a contact and the data is separated by commas. You can export it from Excel, Google Sheets or any other spreadsheet program.
- Excel (.xlsx): Microsoft Excel’s native format.
The file must include at least one column with each contact’s email address. The maximum file size is 50 MB.
Step 1: Go to the fans section
Section titled “Step 1: Go to the fans section”In the side menu, click Fans, inside the Audience block.
The list of all your organisation’s contacts opens. In the top-right corner you’ll see two buttons: “Create user” and “Import users”.
Step 2: Open the import wizard
Section titled “Step 2: Open the import wizard”Click Import users.
The import screen opens. You’ll see two sections:
- A banner at the top that lets you generate a CSV template with the fields you want to include (recommended if you don’t have the file ready yet).
- An upload area where you drag your file or select it from your file explorer.
Step 3: (Optional) Download a template with the fields you need
Section titled “Step 3: (Optional) Download a template with the fields you need”If you don’t have the file ready yet, Nevent can generate an empty template with exactly the columns you want.
Click the Generate import template banner. A dialog opens where you can check the fields you want to include:
| Field | Type |
|---|---|
| Email address | Required (can’t be unchecked) |
| Name | Optional |
| Phone | Optional |
| Date of birth | Optional |
| Gender | Optional |
| Tax ID | Optional |
| Address | Optional |
| Folders | Optional |
| Marketing consent | Optional |
| Custom fields | Optional |
Check the ones you need and click Download. The downloaded CSV file will already have the column headers in place, ready for you to fill in the data.
Step 4: Upload your file
Section titled “Step 4: Upload your file”In the upload area, drag your CSV or Excel file directly, or click Select file to browse for it on your computer.
Once the file is processed successfully, Nevent automatically moves you to the next step: field mapping.
Step 5: Map the columns of your file
Section titled “Step 5: Map the columns of your file”In this step you assign each column of your file to the corresponding field in Nevent.
The screen shows a table with three main columns:
- CSV column: the header name as it appears in your file, with an example of the first row’s data.
- Nevent field: the dropdown where you choose which Nevent field that column corresponds to.
- Mapped and Valid sample: indicators confirming whether the mapping is correct.
Nevent tries to automatically map the most common columns. For example, if your column is called “email” or “correo”, it detects it on its own and assigns it to “Email address”.
For columns Nevent doesn’t recognise automatically, click the Select field dropdown and choose the correct option. Available fields include: First surname, Second surname, Phone, Date of birth, Gender, Country, Address, Postcode and several others, including any custom fields you’ve created in your organisation.
Once all the fields you want to import show a Yes in the “Mapped” column, click Next: Consent.
Step 6: Indicate whether the contacts have given consent
Section titled “Step 6: Indicate whether the contacts have given consent”Nevent asks whether these people have agreed to receive marketing communications from you.
You have two options:
- Yes, they’ve consented: the contacts will be able to receive your email campaigns and be included in segments for promotional campaigns.
- No, they haven’t consented: the contacts are imported but won’t receive marketing campaigns. They’ll only receive transactional communications, such as purchase confirmations or tickets.
Further down on this same screen you can also decide whether you want to add the contacts to a segment when importing them:
- Don’t add: the contacts are imported and that’s it. You can organise them afterwards.
- Existing segment: adds the contacts to a list segment you already have.
- New segment: automatically creates a new segment with all the contacts from this import.
Choose whichever option fits best and click Next: Review.
Step 7: Review the summary and confirm
Section titled “Step 7: Review the summary and confirm”Before launching the import, Nevent shows you a summary of everything you’re about to import:
- The uploaded file and its size.
- The number of contacts and columns in the file.
- The consent option you chose.
- The destination segment, if you chose one.
- The fields to be imported with their mapping.
Check that everything is correct. If something isn’t right, use the Back button to go back and fix it.
Once everything is correct, click Confirm and import. Nevent will process the file in the background. A notice on screen will let you know you can follow the progress in the history.
The import history
Section titled “The import history”You can check the status of all your imports at any time. Click the History button in the top-right corner of the import screen.
The history shows each import with its status (in progress, completed, with errors), the date and the number of contacts imported. While there are imports in progress, the page refreshes itself every 10 seconds.
The segmentation sync status
Section titled “The segmentation sync status”An import marked Completed means the contacts are already in your fan base. But before you can use the fields you brought in the file as criteria in a segment, Nevent needs a second step: syncing that import with the segmentation engine.
That’s why, under the status of each import, a second tag may appear telling you where that sync stands:
| Tag | What it means |
|---|---|
| Preparing segmentation | The import has finished and the sync is queued. |
| Syncing | The contacts are being added to the segmentation engine. |
| Ready to segment | All set: you can now use this import’s data in your segments. |
| Sync incomplete | The sync stopped before finishing. You can retry it. |
| Nothing to sync | The import didn’t carry new data to send to segmentation. |
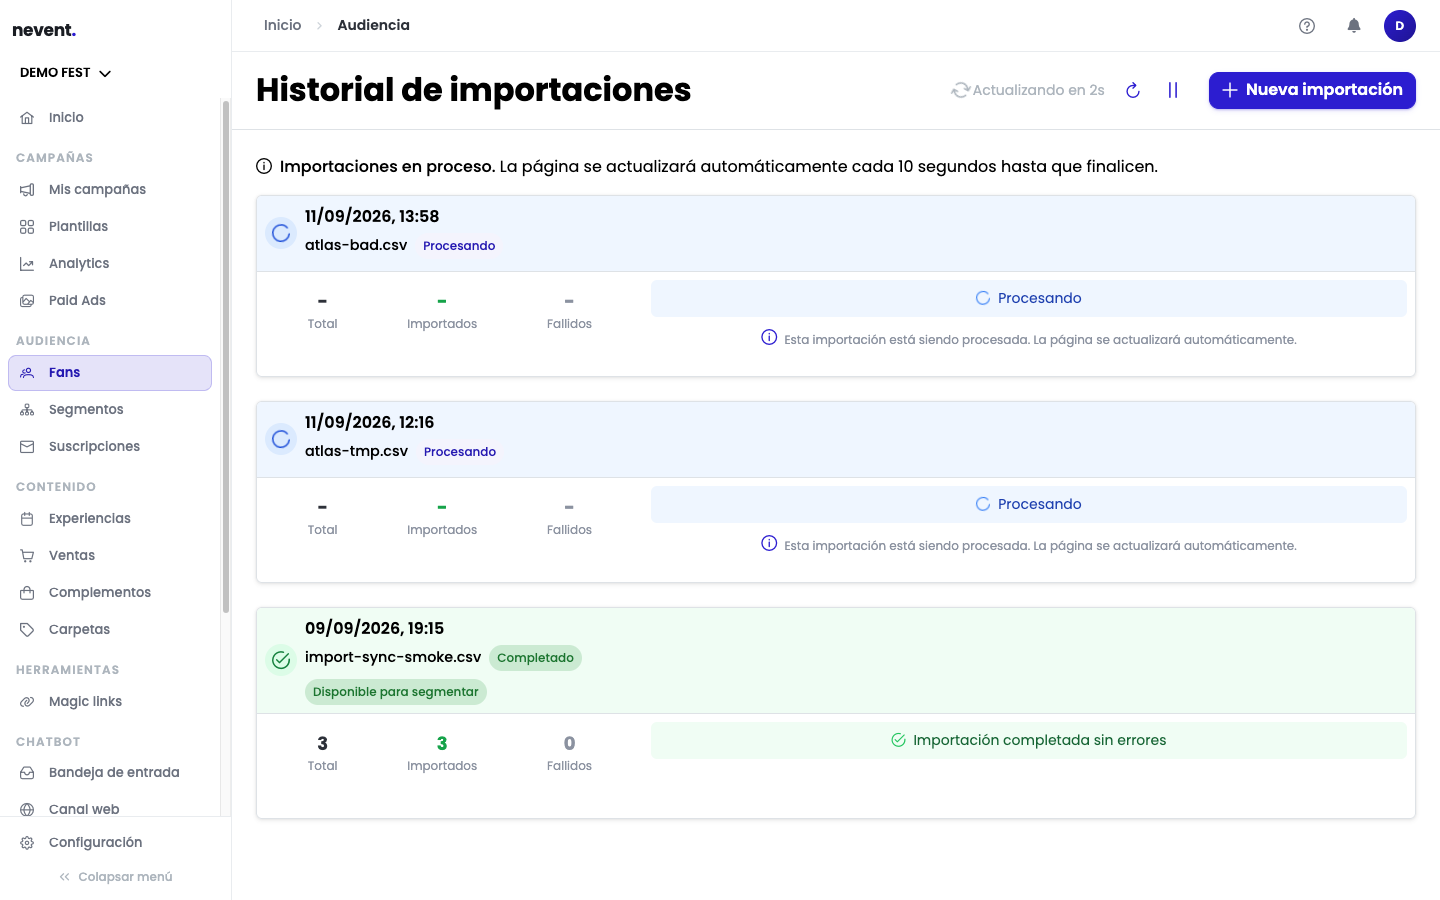
If an import ends up as Sync incomplete, a Retry button appears next to the tag. It relaunches only the sync with segmentation: it doesn’t re-import the file. When you click it you’ll see the notice “Sync retried. It may take a few minutes.” and the status will keep updating on the page itself.
Result
Section titled “Result”Your contacts are now imported into Nevent. From now on they appear in the Fans section and you can send them campaigns, include them in segments or look them up one by one.
Next step
Section titled “Next step”- Create your first segment to group your fans by criteria and have them ready for campaigns.
- Create your first campaign to send an email to the contacts you just imported.